Best Power Up Order and Refund Strategy in Vampire Survivors

Optimizing permanent upgrades in Vampire Survivors requires purchasing the most expensive Power-Ups first to minimize the +10% cost escalation penalty, combined with strategic free refunds during early progression.
The Price Escalation Formula and Free Refund Mechanic
In Vampire Survivors, permanent stat upgrades purchased through the main menu follow a compounding cost formula. Each time an upgrade rank is purchased across any attribute, the price of every remaining unbought rank increases by exactly 10% of its base cost. Mathematically, the cost of a rank is given by: Base Cost × (1 + 0.10 × Total Previously Purchased Ranks). Consequently, buying low-cost upgrades first inflates high-tier purchases such as Revival and Amount into enormous coin sinks. Purchasing in reverse order can drive total expenditure beyond 400,000 gold coins, while an optimal high-to-low order saves over 200,000 gold. Fortunately, the Refund PowerUps button returns 100% of invested coins at zero penalty, allowing risk-free restructuring. Review early survival stages via our Mad Forest stage guide.

Mathematical Purchase Priority for All 29 Power-Ups
To minimize inflation penalties across all 29 upgrades, players must purchase tiers in strictly descending order of base cost. Start with top-bracket investments: Charm (base cost 10,000), Revival (10,000), Seal All (8,000), Seal III (6,000), and Amount (5,000). Securing these while total purchased ranks are near zero avoids thousands of coins in markup. Next, purchase the intermediate bracket: Seal II (4,000), Seal I (2,000), Curse (1,666), Omni (1,000), Cooldown (900), Growth (900), Armor (600), and Luck (600). Follow with 500-cost upgrades: Fever, Invul Time, Preserve, and Reroll. Finally, purchase base-cost 300 upgrades (Area, Duration, Magnet, Move Speed, Speed), followed by 200-cost passives (Greed, Max Health, Might, Recovery), 100-cost options (Banish, Skip), and Defang (10). Compare passive in-run mechanics using our all passive items directory.
| Power-Up | Max Rank | Base Cost | Price Tier | Stat Bonus Description |
|---|---|---|---|---|
 Charm | 5 | 10,000 | Tier 1 (High Cost) | Increases enemies spawn quantity by 20 per rank (max +100). |
 Revival | 1 | 10,000 | Tier 1 (High Cost) | Revives once with 50% health. |
| Seal All | 10 | 8,000 | Tier 1 (High Cost) | Allows you to Banish four items from level up choices, or a pickup from light sources. Use in COLLECTION menu. |
 Seal III | 10 | 6,000 | Tier 1 (High Cost) | Allows you to Banish three items from level up choices, or a pickup from light sources. Use in COLLECTION menu. |
 Amount | 1 | 5,000 | Tier 1 (High Cost) | Fires 1 more projectile (all weapons). |
 Seal II | 10 | 4,000 | Tier 2 (Mid-High Cost) | Allows to Banish two items from level up choices, or a pickup from light sources. Use in COLLECTION menu. |
 Seal I | 10 | 2,000 | Tier 2 (Mid-High Cost) | Allows to Banish an item from level up choices, or a pickup from light sources. Use in COLLECTION menu. |
 Curse | 5 | 1,666 | Tier 2 (Mid-High Cost) | Increases enemy speed, health, quantity, and frequency by 10% per rank (max +50%). |
 Omni | 5 | 1,000 | Tier 2 (Mid-High Cost) | Increases Might, Projectile Speed, Duration, and Area by 2% per rank (max +10%). |
 Cooldown | 2 | 900 | Tier 3 (Mid Cost) | Uses weapons 2.5% faster per rank (max 5%). |
 Growth | 5 | 900 | Tier 3 (Mid Cost) | Gains 3% more experience per rank (max 15%). |
 Armor | 3 | 600 | Tier 3 (Mid Cost) | Reduces incoming Damage by 1 per rank (max -3). |
 Luck | 3 | 600 | Tier 3 (Mid Cost) | Chance to get lucky goes up by 10% per rank (max +30%). |
| Fever | 1 | 500 | Tier 3 (Mid Cost) | Increases duration of Gold Fever and Gold Finger by 10% per rank (max +50%). |
 Invul Time | 1 | 500 | Tier 3 (Mid Cost) | Increases invulnerability time after getting damaged by 50ms per rank (Max 250ms) |
| Preserve | 5 | 500 | Tier 3 (Mid Cost) | Reroll, Skip and Banish actions have a 10% chance to be preserved per rank (max 50%). |
 Reroll | 5 | 500 | Tier 3 (Mid Cost) | Twice per rank, allows you to get different choices when leveling up. |
 Area | 2 | 300 | Tier 4 (Low Cost) | Augments area of attacks by 5% per rank (max +10%). |
 Duration | 2 | 300 | Tier 4 (Low Cost) | Effects from weapons last 15% longer per rank (max +30%). |
 Magnet | 2 | 300 | Tier 4 (Low Cost) | Items Pickup range +25% per rank (max +50%). |
 Move Speed | 2 | 300 | Tier 4 (Low Cost) | Character moves 5% faster per rank (max 10%). |
 Speed | 2 | 300 | Tier 4 (Low Cost) | Projectiles move 10% faster per rank (max 20%). |
 Greed | 5 | 200 | Tier 4 (Low Cost) | Gains 10% more Gold per rank (max +50%). |
 Max Health | 3 | 200 | Tier 4 (Low Cost) | Augments Max Health by 10% per rank (max +30%). |
 Might | 5 | 200 | Tier 4 (Low Cost) | Raises inflicted Damage by 5% per rank (max +25%). |
 Recovery | 5 | 200 | Tier 4 (Low Cost) | Recovers 0.1 HP per rank (max 0.5) per second. |
 Banish | 5 | 100 | Tier 4 (Low Cost) | Twice per rank, allows you to remove an item from level up choices, for the rest of the run. |
 Skip | 5 | 100 | Tier 4 (Low Cost) | Twice per rank, allows you to skip level up choices and get Experience instead. |
 Defang | 5 | 10 | Tier 4 (Low Cost) | 3% of enemies spawn unable to deal damage per rank (max 15%). |
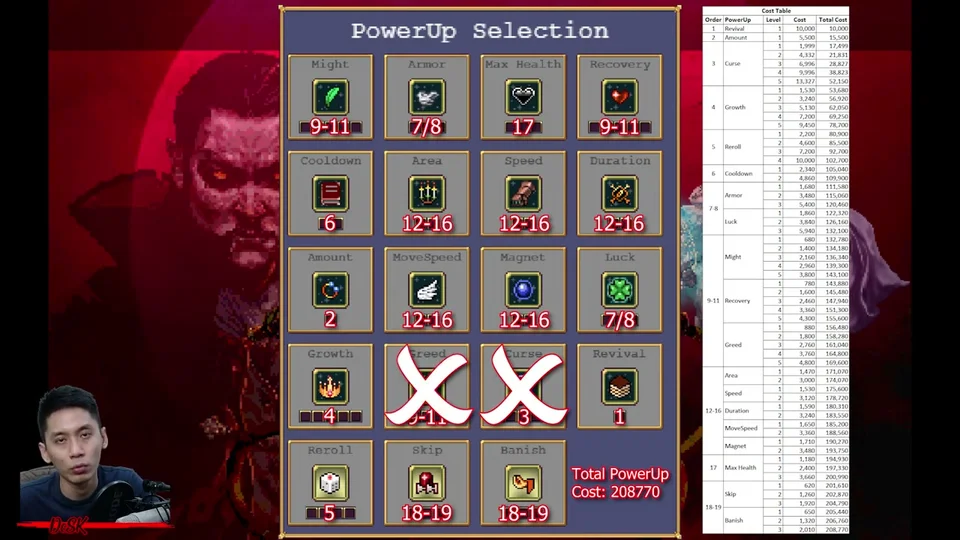
Early Game Farming Order and Respec Strategy
While buying the most expensive upgrades first is mathematically optimal for complete accounts, beginners starting with under 20,000 coins should not save for Revival. Stashing gold for single expensive nodes leaves your character underpowered during initial survival runs. Instead, adopt a two-phase strategy: early runs should invest in Greed to boost coin drops, paired with Growth and Magnet for rapid leveling, and Might for raw combat clears. Avoid Curse and Charm until late-game damage builds are established. Reach level 20 in  Mad Forest to unlock
 Inlaid Library, and consult The Bone Zone gold farming build for coin accumulation. Once accumulated gold reaches 60,000 to 100,000 coins, trigger Refund PowerUps and rebuild using the high-to-low hierarchy.